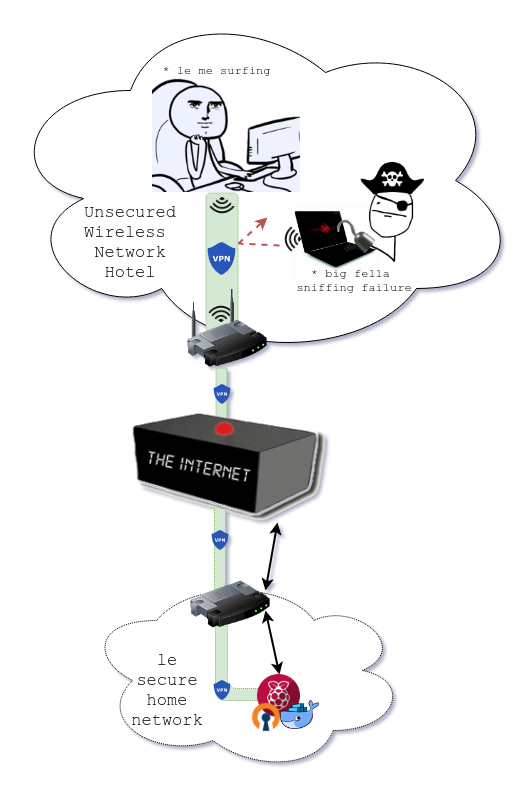
If you feel the need to protect your Internet connection because for example you are in a Hotel or a Library that offers unsecured wireless access to Internet or simply because you want to add a layer of encryption to your Internet mobile connection, it is time to think on a VPN solution.

Today for a few dollars per month you can have a VPN server up and running in less than an hour. For instance, Digital Ocean for 5$ per month helps you to set up your own VPN service (more info). This is $60 a year, not bad if you don’t want to worry about maintenance.
Another solution is to use your own Home Internet connection, usually routers include a friendly way to create a VPN service with username and password. ASUS Routers offers the option of activate an OpenVPN server, the configuration is very friendly and straightforward. The investment will be the money you are paying currently for your Internet connection plus an extra time to keep up and running the service.
This solution is good enough for me, but to ensure an extra layer of security, the ideal solution for me includes Two-Factor authentication.
In order to provide this solution we would need a server in our internal network, the best thing here is to use a Raspberry Pi. Here’s what I did:
Requirements to complete this guide:
- A Raspberry Pi with Internet access and Docker installed.
- Access to the router configuration of your Internet service provider.
- Google Authenticator (iOS and Android) installed in your mobile in order to generate OTP tokens.
This guide is based on docker-openvpn project, thanks to Kyle Manna for his contribution. I just built a Docker image for armhf architecture, you can see the content of my Dockefile here
Docker installation
If you don’t have Docker installed on your Raspberry, you can read the article Docker & Raspberry Pi, perfect combo,
in there I describe how to install it.
Port Forwarding
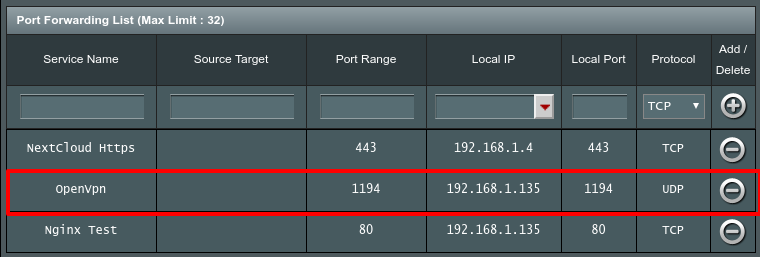
In your Home internet router you will have to forward UDP protocol from port 1194 to port 1194 on your Raspberry.
This is how it looks in my router configuration

OpenVPN setup
Environment variables
To make the installation easier, you should create two environment variables, OVPN_DATA is the name of the docker volume where OpenVPN configuration and certificate files are stored and CLIENTNAME is the name of your first client username.
1 | OVPN_DATA=ovpn-data && CLIENTNAME=luis-toubes |
Docker volume
We will need a docker volume to store server and client certificates and configuration files. You should always keep safe this volume.
1 | sudo docker volume create --name $OVPN_DATA |
Init configuration
This step will create initial configuration files for your OpenVPN server.
Before running this step, it would be great if you could set up a service like https://www.noip.com/. It will allow you to access your internal network using a domain. ASUS routers give the opportunity to create a free domain for this purpose.
Assuming the domain to access your internal network is coyote.bipbip.com, the command to initialize OpenVPN configuration will be:
1 | sudo docker run -v $OVPN_DATA:/etc/openvpn --rm kafebob/rpi-openvpn ovpn_genconfig -u udp://coyote.bipbip.com -2 -C AES-256-GCM |
OpenVPN server certificate
Creates a CA authority certificate.
1 | sudo docker run -v $OVPN_DATA:/etc/openvpn --rm -it kafebob/rpi-openvpn ovpn_initpki |
If you run this command from Raspberry, the process will take some time to generate the key, be patient.
During this step you will be asked for a password to protect generated CA certificate private key, remember this password because every time you create a new client certificate, CA certificate will be used.
OpenVPN start
Start OpenVPN server with previous setup
1 | sudo docker run -v $OVPN_DATA:/etc/openvpn -d -p 1194:1194/udp --name my-ovpn-server --cap-add=NET_ADMIN kafebob/rpi-openvpn |
OpenVPN clients
Create a client
Create a client certificate you will use to connect from the Internet. During this process the container will prompt for the CA certificate password from previous step.
1 | sudo docker run -v $OVPN_DATA:/etc/openvpn --rm -it kafebob/rpi-openvpn easyrsa build-client-full $CLIENTNAME nopass |
Two-factor authentication
Enable this security layer for this username.
1 | sudo docker run -v $OVPN_DATA:/etc/openvpn --rm -t kafebob/rpi-openvpn ovpn_otp_user $CLIENTNAME |
This command will generate an URL to Google OTP service. Open in a browser this URL and you will get an image with a QR code.
Now you need to scan this QR Code with Google Authenticator app in order to finish the one time password generator configuration.
Generate ovpn file
It is time to generate an ovpn file with information about the VPN.
1 | sudo docker run -v $OVPN_DATA:/etc/openvpn --rm kafebob/rpi-openvpn ovpn_getclient $CLIENTNAME > $CLIENTNAME.ovpn |
OpenVPN test
Send to your mobile the ovpn file generated previously and load a new vpn account with this file. Username will be $CLIENTNAME value used during VPN setup and the password will be one of the tokens generated by Google Authenticator app. I use in Android OpenVPN Connect as my VPN client.
Before test connection, using only your Internet mobile connection check the IP address you have currently assigned. Use a service such as https://www.whatismyip.com/my-ip-information/.
Now try to connect to the VPN, if everything has been setup correctly, your IP address has changed and now you are connected through your Home Internet provider.
I hope you have succeeded, any questions asked me in the comments down below.
Commands summary
1 | OVPN_DATA=ovpn-data && CLIENTNAME=luis-toubes && \ |
Happy coding!